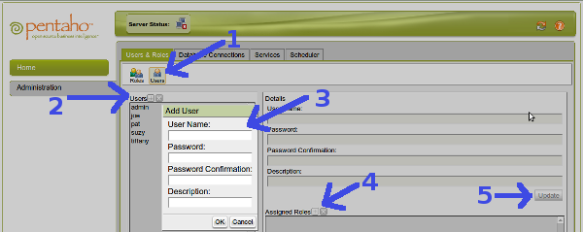
Add Your Users
You should assign a user name and password to each person that will be signing-in into your Pentaho BI system. There are no policies to renew or control unsuccessfull attempts, so be very clear with your clients about password confidentiality. To create an account follow this are steps:
- Start the Pentaho Administration Console (PAC).
Use file browser (last time we used a command terminal, But now we know that it works and don’t need to read the messages) and go to the folder:
<HOME>/Pentaho/administrator-console/
double click on:
start-pac.sh
Click ‘Execute’ button. - Open your internet browser on http://localhost:8099
Login with admin/password.
Ignore the connection refused message if your BI server is not running. - Click on Administration tab to your left in the screen.
- Before clicling on the ‘Users’ icon, notice the eight default roles (the default view).
For now the most important to us is ‘Authenticated’ one as is the one we’ll be assigning to our users. - Now click on the ‘Users’ Icon (see image, #1).
Click on the ‘plus’ (see image, #2) Icon to open the dialog so you can type the username, password and description of the activities of the user, this is for your control only (see image, #3).
Click OK to close the dialog. - Click on the ‘plus’ (see image, #4) role icon.
Select Mand move to the left list, the ‘authenticated’ element and click OK to close the dialog. - When you finish you can click on Update (see image, #5) to end this procedure.
And so on for each user. To stop the PAC, exit the browser and run:
Pentaho/administration-console/stop-pac.sh .
Access Authentication
For most of us we should stop here as we have now the functionallity needed by most instalations. That is:
- Allow access only to persons that you have granted permission.
Remember that only a handfull of people should be on your pilot project as they’ll need a lot of your time and guidance.
The selected processes/areas you’re starting with, are also a few. - You will use ‘folders’ to group department o process needs.
That will ease navigation for your users.
You’ll see, most people will go to their folder, get the information they need and get out. The mayority of people will insist on direct delivery of information. And if someone needs information from other area, there should be access to it. You shouldn’t give in to the temptation to set information silos. -BI is meant for users and information freedom-.
And there is another technical reason for not to set up authorization control in Pentaho. And that is that we have been using a file system to this point. If we want to control visibility of solutions/reports/data we must switch to a database repository that is SLOW, really slow. You must have really sensitive information to go this way as you will learn that you have to add parameters to each metadata layer o olap model, workflow, dashboard, etc.
So thats it, set up your users and check the activity as finished. 🙂
Authorization Control
But, if you must comply with authorization control you must use a database for the metadata repository.
Repositories
There are three references to repositories types in Pentaho:
- Solution repositories: Is a collection of files in folders. In our current installation you can refer to the ‘steel-wheels’ folder under Pentaho\biserver-ce\pentaho-solutions\ but you can tell the BI server to look for them in a database.
- Metadata repository: This is the actual authorization layer that we are refering in this post. You can define access here for tables or columns. We’ll mention how to do that in a futre posts.
- The PDI/ETL Repository: Kettle (the ETL tool) can use use local files for the transformation programs it uses but it can also use a database to store, share and control them more easily.
There will be an article of the metadata editor, then we’ll continue this configuration.

